
Commercial Batting Cage Frame Kits 12ft x 14ft x 70ft
EMT poles are NOT included
EMT poles are NOT included
EMT poles are NOT included
The Jones-Sports Deluxe Commercial Frame Kit is engineered to stand up in the wind and take plenty of abuse.
• The frame has arches with three strong cables going the length of the frame to support the batting cage.
• Ground sleeves are concreted into the ground to provide strength
• There are arch supports at each end of the frame to make the frame rigid
• Elbows and ground sleeves are made in America and are 14 gauge 2.25″ steel
Due to shipping costs, purchasing your poles locally will save you money!
When purchasing a 70x14x12 frame kit, these are the poles you will need:
(12) 2” EMT Tubing | Home Depot SKU : 580031
(4) 1.5” EMT Tubing | Home Depot SKU : 613975
Shipping: Because of the size & weight this frame kit will be on a pallet & delivered by truck. The truck driver will call you to arrange a delivery time. If you do not have a forklift, you can remove the pieces from the pallet individually.
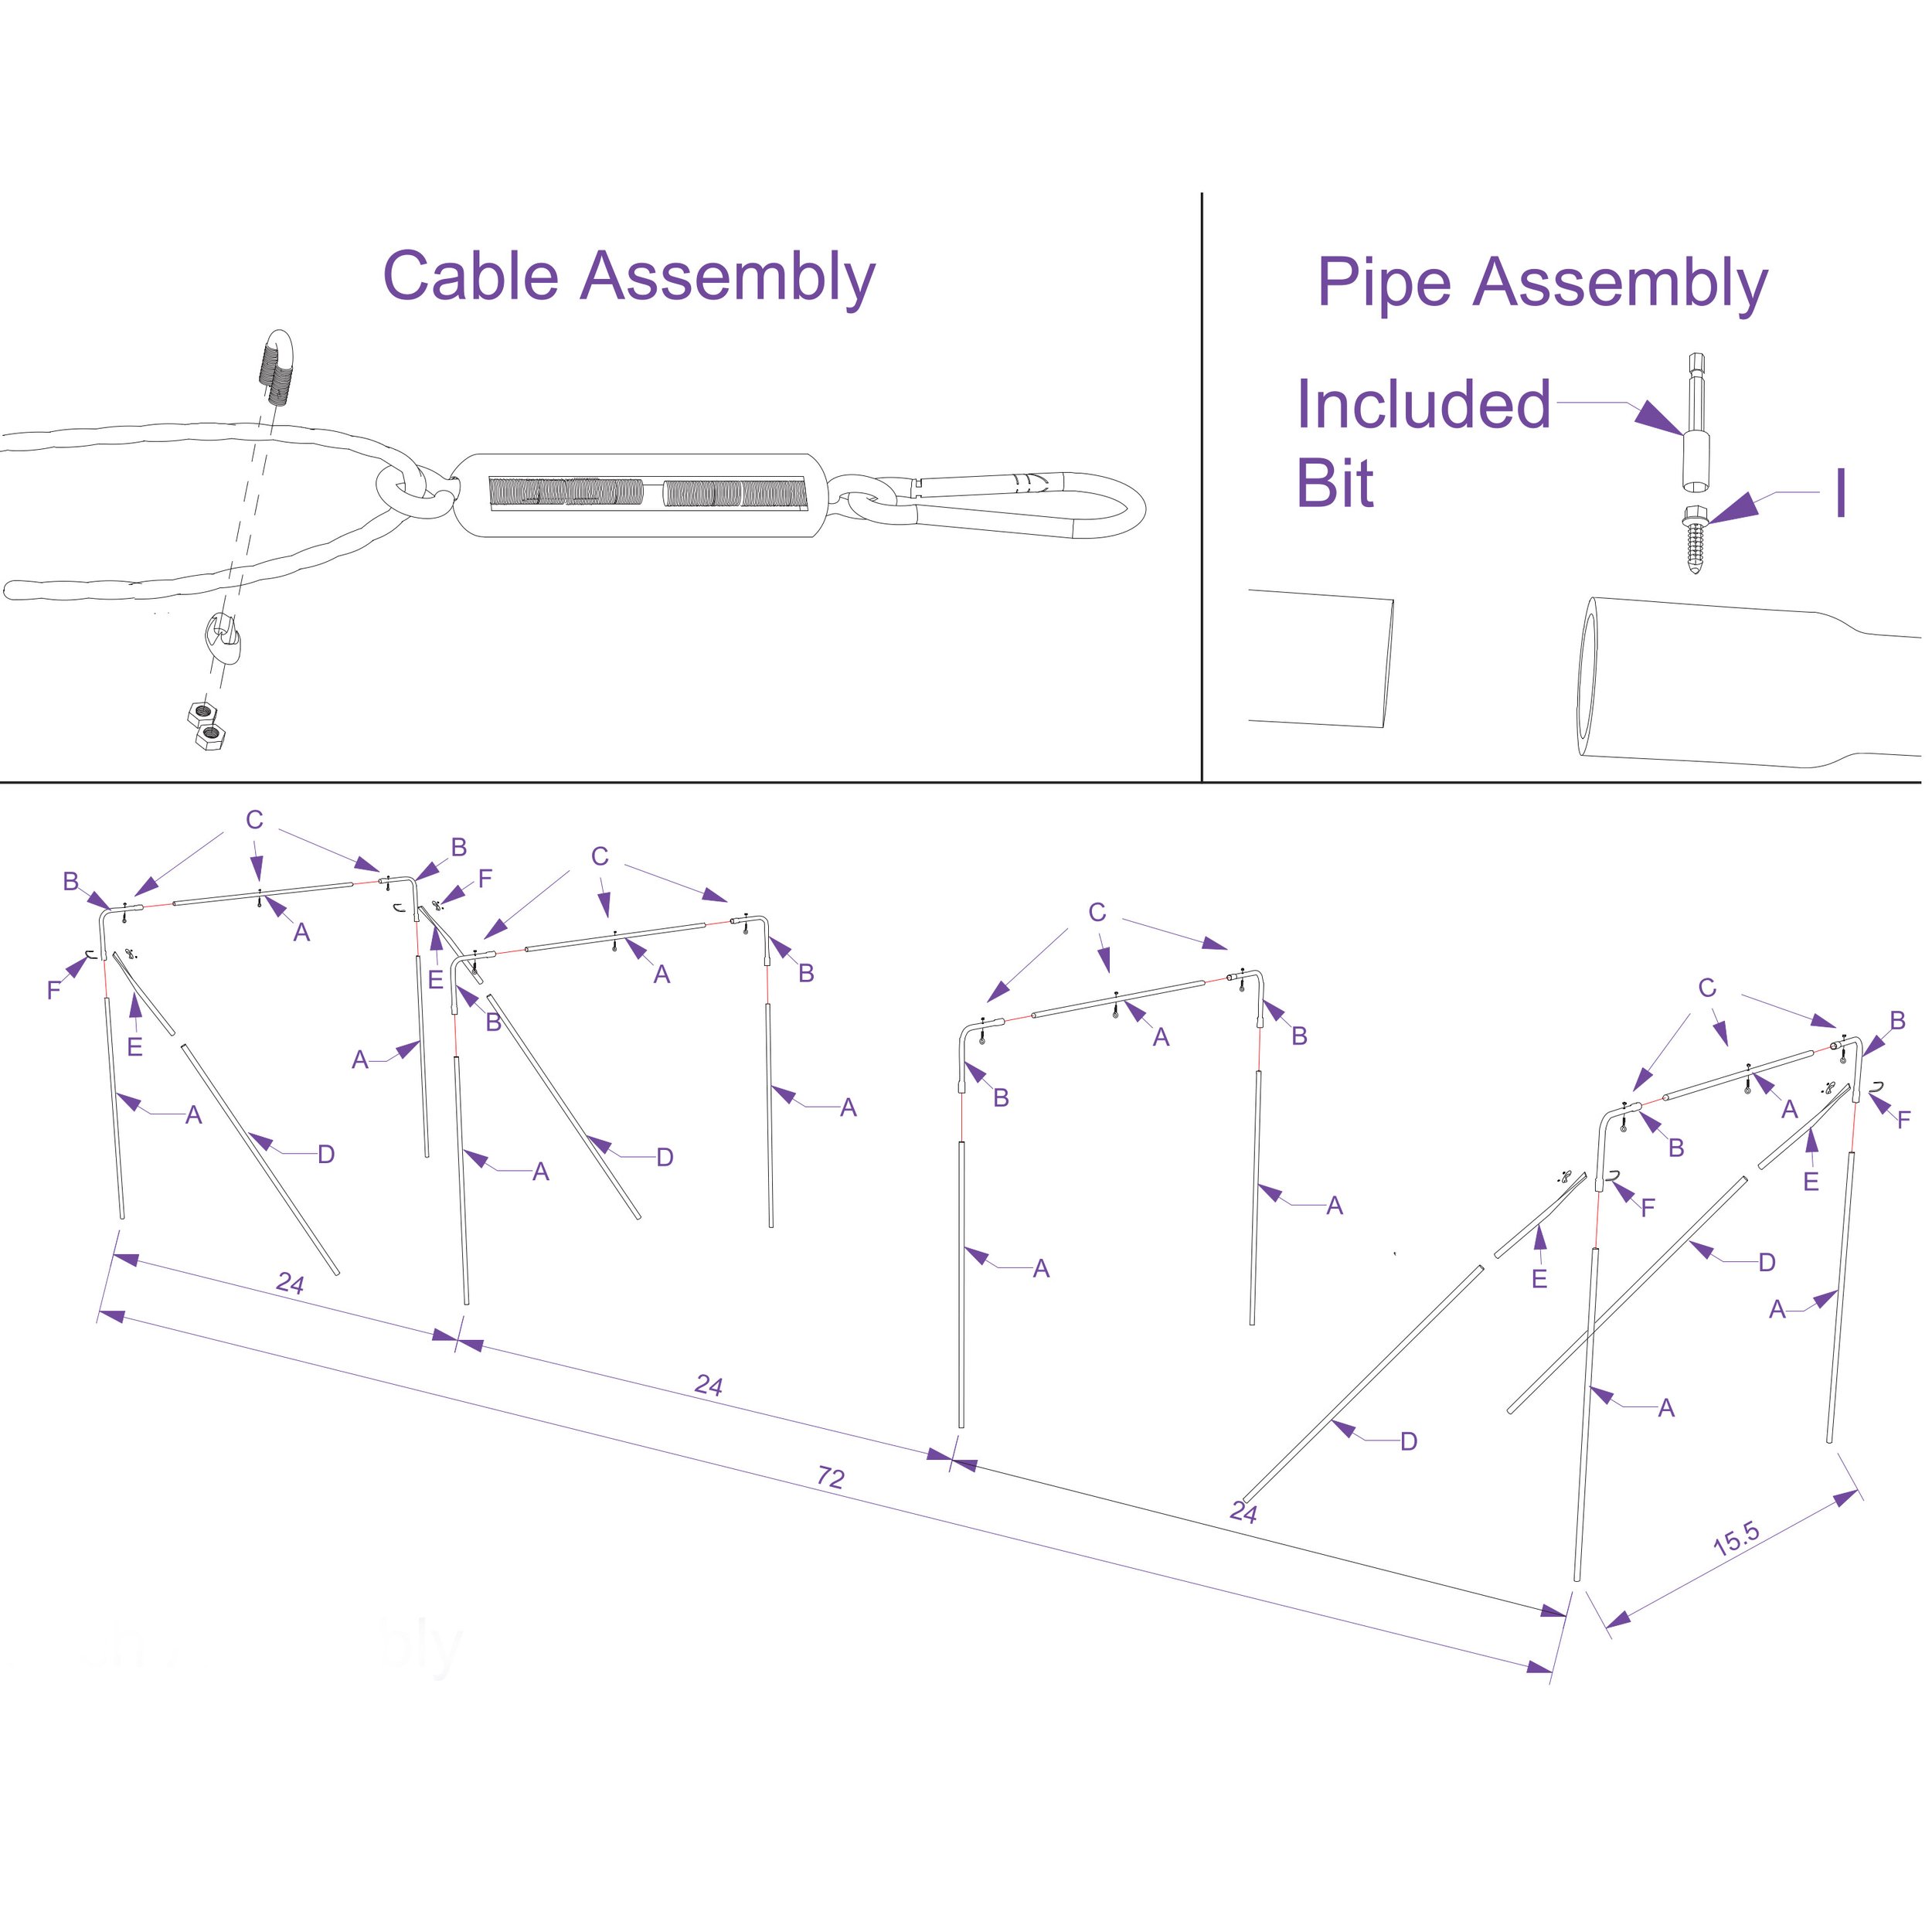
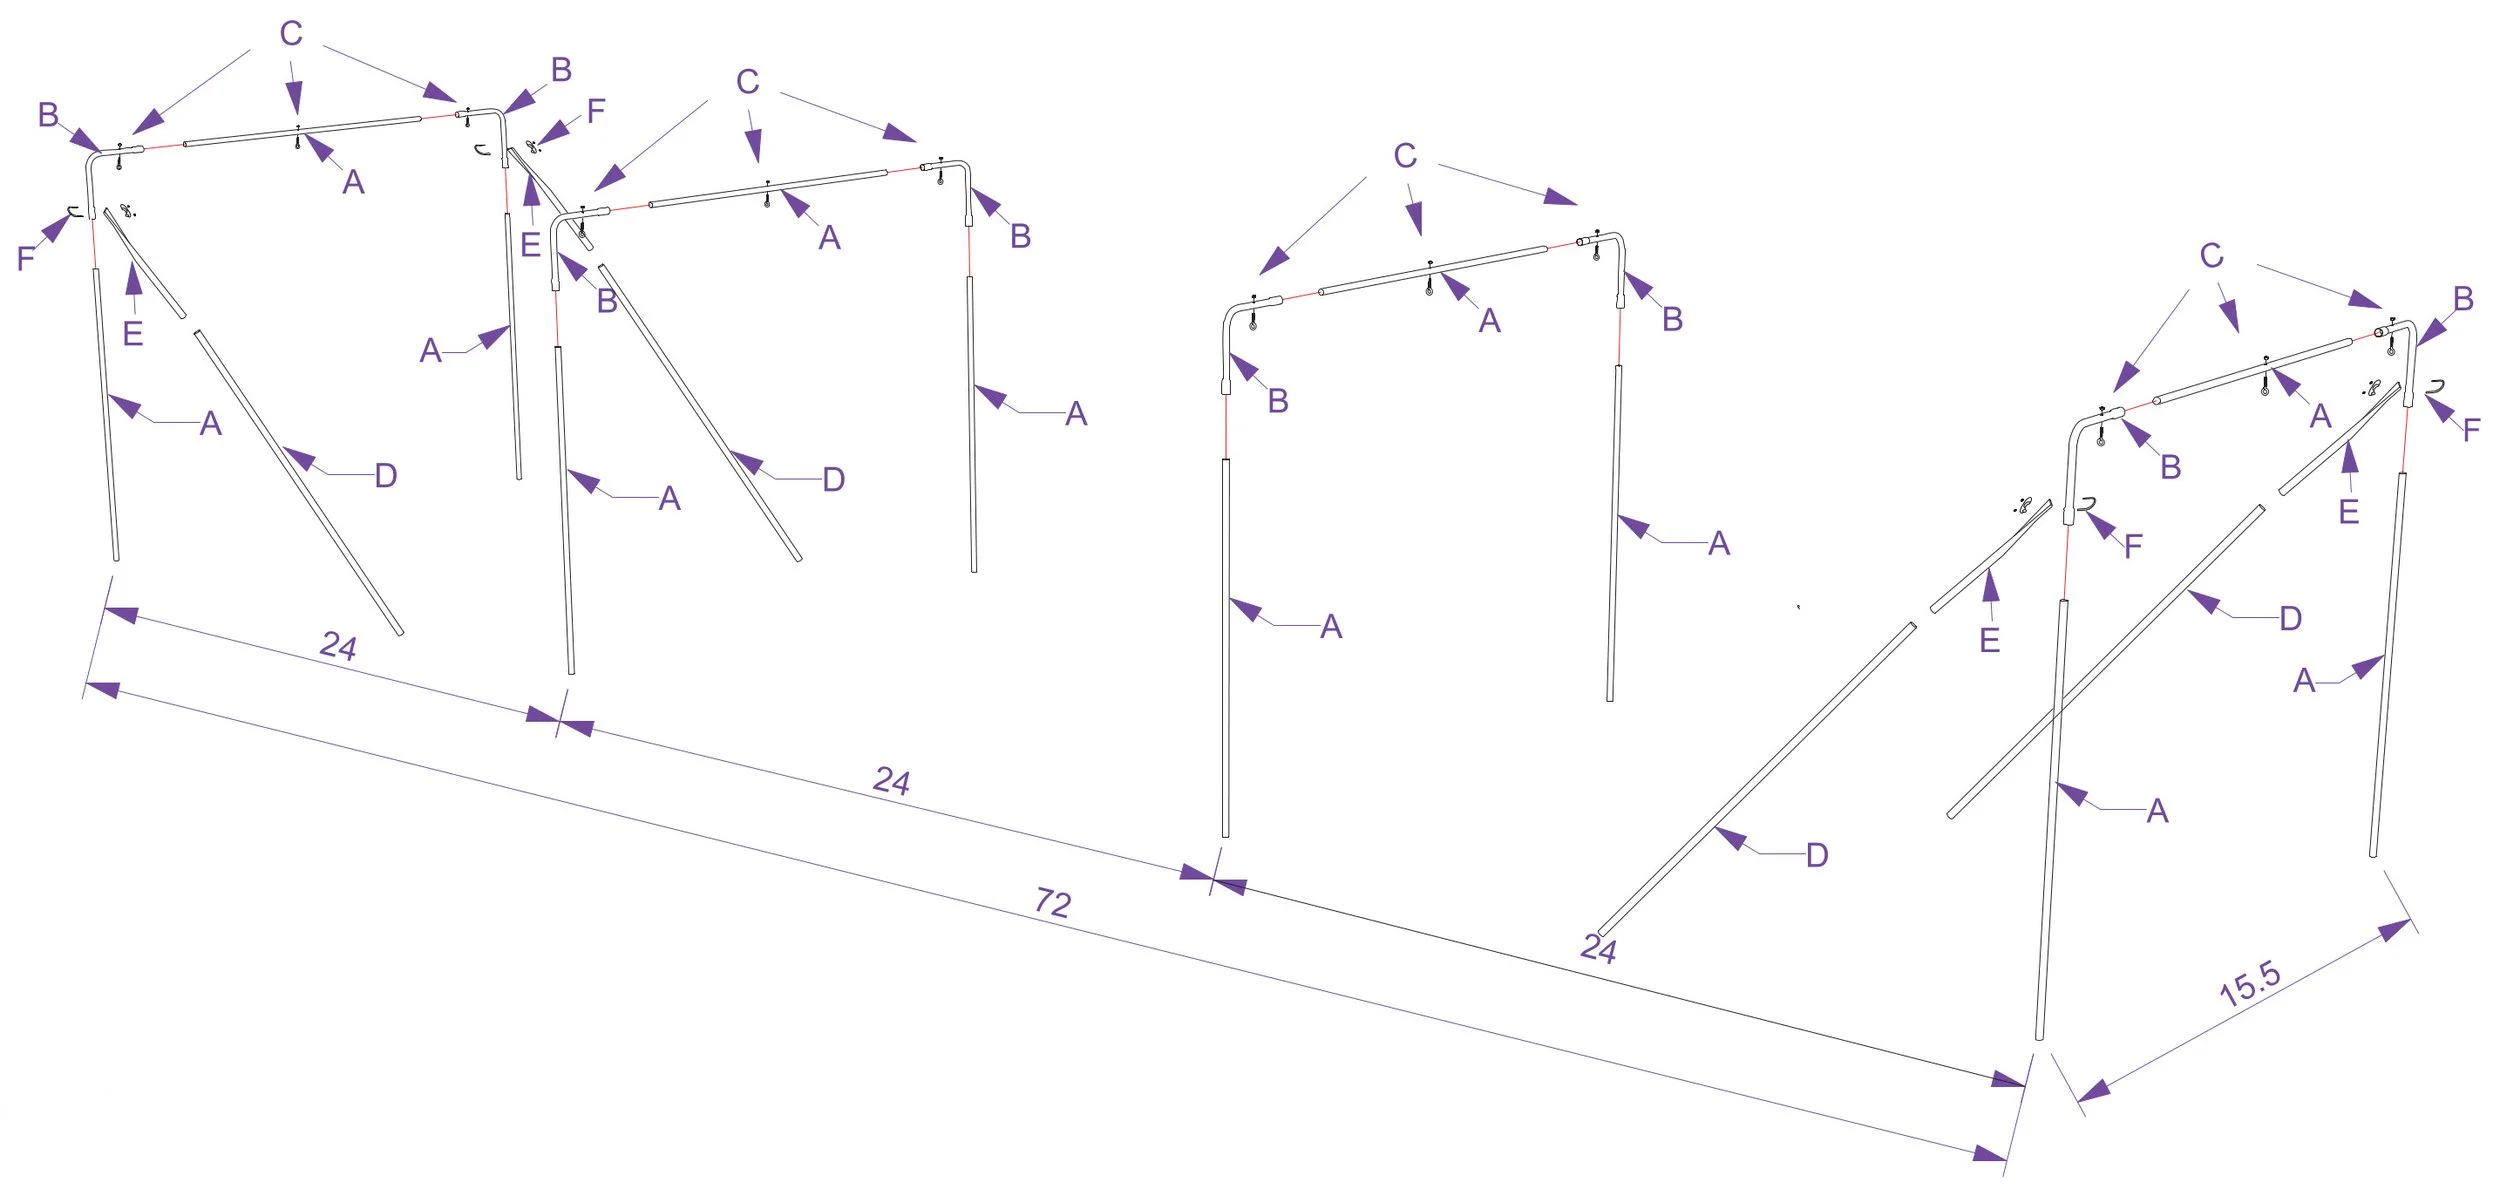
Directions: for 70x14x12 Deluxe Commercial Frame
A - 10′ lengths of 2″ EMT (Home Depot SKU : 580031) 12pk - Not Included
B - 3′ x 2′ Elbows 8pk
C - Eyebolt and Nut 12pk
D - 10′ lengths of 1.5″ EMT (Home Depot SKU : 613975) 4pk - Not Included
E - Angle Support 4pk
F - 2.25″ Muffler Clamps 4pk
G - Arch Ground Sleeves (2 1/4″) 8pk
H - Angle Support Ground Sleeves (1 1/2″) 4pk
I - Carabiners 54pk
J - Self-drilling screws 32pk
K - Drill Bit (for screws) 1pk
L - Lengths of Cable 3pk
M - Turnbuckles 6pk
N - U-Bolts 6pk
Please review the parts that you received to be sure that you have all the parts. If you have purchased the kit, you will have to go to the local hardware store and purchase the pipe (A & D). We have supplied you with the sku numbers for Home Depot and Lowes. If you purchased the complete frame, the poles will be delivered to you separately from the rest of your order.
You will need to purchase concrete to secure your arches into the ground. We recommend one 60lb. bag of Quikrete per Arch Ground Sleeve(G) and half of a bag for each Angle Support Ground Sleeve(H).
Plan on taking 2 days to complete the batting cage frame. We recommend getting the Arch Ground Sleeves(G) set (Through step 10) on one day and then returning to finish the job the next day. This allows the concrete to fully set.
You will need about a 15.′ x 71′ area for your new batting cage. It is recommended that you mark off this area before starting.
TAKE DOWN YOUR CAGE IN THE WINTER. Snow will pile on top of the cage and that will bring down even the strongest batting cage
1. Lay out four Elbows (B) with the 3′ sides facing each other and the 2′ sides going the length of the cage at the perimeter of the cage. Lay out the rest of the Elbows (B), between the end arches so that they are about 28′ from each other.
2. Assemble the arches by adding two 10′ lengths (A) to the elbow′s (B) 2′ side for the vertical legs, and one 10′ length (A) for the top cross member. Insert one of the self-drilling screws(J) at each junction where the 10′ lengths (A) attach to the arches (B). Finish the rest of the arches the same way.
3. Dig holes for Arch Ground Sleeves(G) about 6″- 8″ in diameter and about 19″- 22″ deep, using the assembled arches as a guide. This allows space for cement at the bottom. The ground sleeves (G) are 20″ long including the fluted area. Make sure that, when set the tops of the ground sleeves (G) are level with each other.
4. Cement the Arch Ground Sleeves(G) into the ground vertically level and level with each other. Remember to leave enough room to attach the upright with self-drilling screws.
5. Install the eyebolts(C) into the arches. Start by drilling 5/16″ holes in the center of the arch. Drill the other holes based on the width of your batting cage on either side of the middle (12′ = 6′ off center, 14′=7′ off center, etc.). We recommend the eyebolts(C) on the end arches to be facing the middle, while the eyebolts(C) for the inner arches face down.
6. Insert the arches into the ground sleeves after the concrete has been allowed to set for the recommended time. Secure the arches into the ground sleeves(G) with the self-drilling screws (J)
7. Assemble the angle supports by inserting one of the 1.5″ EMT poles(D) into the angle support(E) and securing it with a self drilling screw(J). Then insert the other end of the pole(D) into an Angle Support Ground Sleeve(H) and securing it with a self drilling screw(J).
8. Dig holes for the Angle Support Ground Sleeves(H) using the assembled angle supports as a guide. The angle supports will be inside the frame 1′ from the top at about a 40° angle.
9. Attach the Angle Support to the Arch using the Muffler Clamp(F). The ground sleeve will be loose in the hole you just dug.
10. Cement the Angle Support Ground Sleeves into the ground. Make sure you still have access to the self-drilling screw you used to secure the pole(D) to the angle support(H) in case you have to take down your frame.
11. Create your cable assemblies by feeding the cable(L) through the turnbuckle(M) and securing a loop with the u-bolt(N). Now feed the cable through the inner arch eyebolts and create a loop on the other end of the cable(L) using another u-bolt(N). Repeat for the remaining cable assemblies.
12. Attach the cable assemblies to the end arches using carabiners. Tighten the cable so there is no sag. Don′t overly tighten the cable though. Some sag once the batting cage is hung is an industry standard. And repeat for the remaining cable assemblies.
13. Attach the batting cage to the cable using carabiners, starting with one side and working your way down.
14. Play ball!!!